使用 ImageJ 批量合并细胞荧光图像
前言
在以慢病毒为载体的转基因操作中,载体序列上通常会带有荧光信号作为基因转入成功与否的标志,通常我们需要对比计数明场和荧光图像,计算感染率,这就需要合并两张图像。
FIJI (Fiji is just ImageJ) 是一种基于 Java 的跨平台开源图像处理软件,相较于其他的图像处理软件,免费、轻量化、精度高,是处理实验拍摄图像的首选。
我们首先讲解单个样本的手动处理,后面介绍如何使用宏命令批量处理。
手动处理的详细步骤
明场图像的处理
明场图像可以观察所有细胞,作为计数荧光信号的背景,因此需要降低亮度,避免过亮的背景掩盖荧光信号。
通常有以下的几个步骤:
- RGB 转灰度
将原来 RGB 三通道的明场图像转换成 8 位灰度图,因为我们后续只将其作为一个通道。

- 调整亮度对比度
原始的明场图像我采集的时候曝光时间比较短,所以本身就比较暗,建议还是采图的时候多曝光一会儿,不然调整亮度后会有很多噪点。
使用 ImageJ 的 Adjust -> Brightness/Contrast 菜单,调整灰度的最大值与最小值,使得整体变暗同时对比度加大。
调整后的图像:
荧光图像的处理
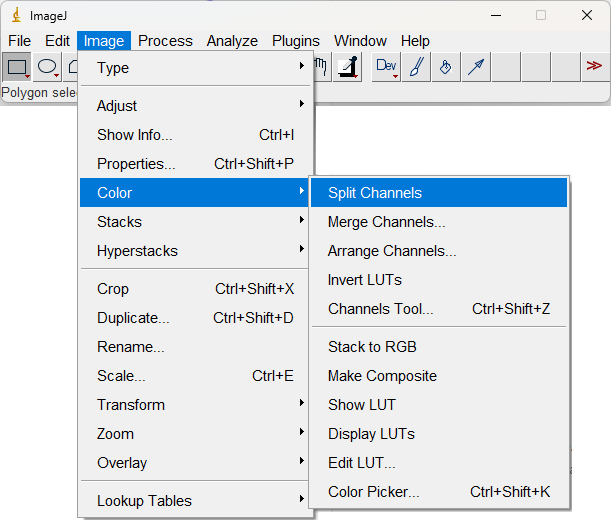
荧光图像因为是彩色图像,首先需要将色彩通道拆分开,然后再调整亮度对比度。
- 使用 Image -> Color -> Split Channels 菜单从彩色图像中单独取出自己需要的通道,比方说演示中使用的是红色通道,因此拆分后只取红色,关闭蓝色和绿色。
拆分前:
拆分操作:
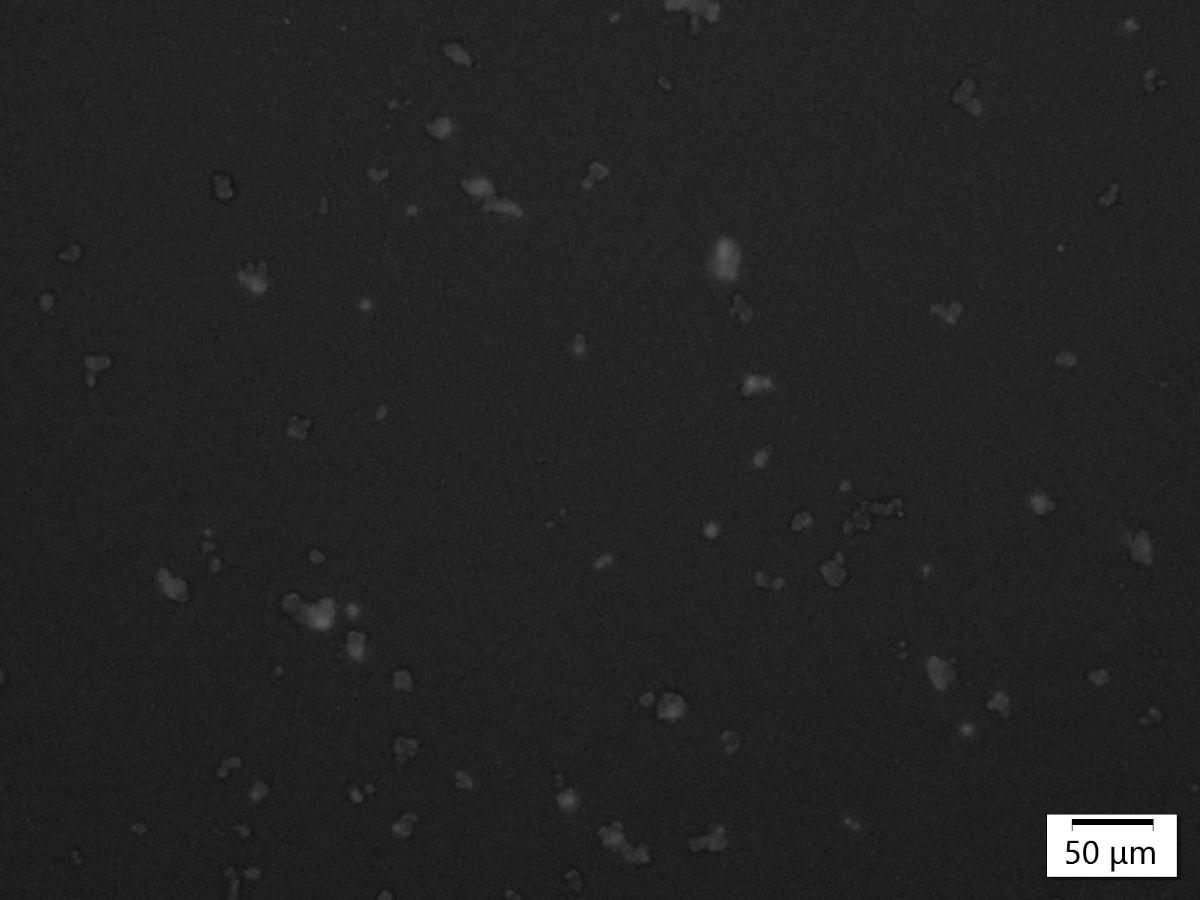
拆分后:
拆分后的图像同样是一个单通道的灰度图。
- 亮度对比度调整
荧光图像同样需要调整亮度对比度,这次调整的目的是降低背景的亮度,剔除一部分非特异荧光,然后将我们需要的信号亮度调明显。同样是调整最大最小值,最大值可以比明场调得更小一点,这样荧光会更明显。
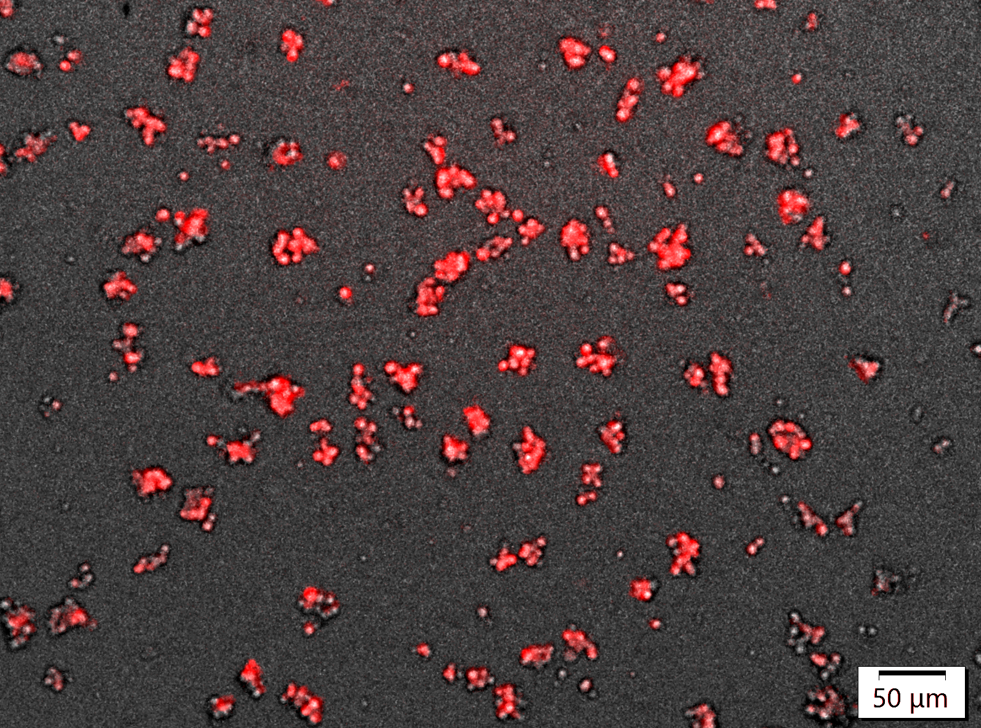
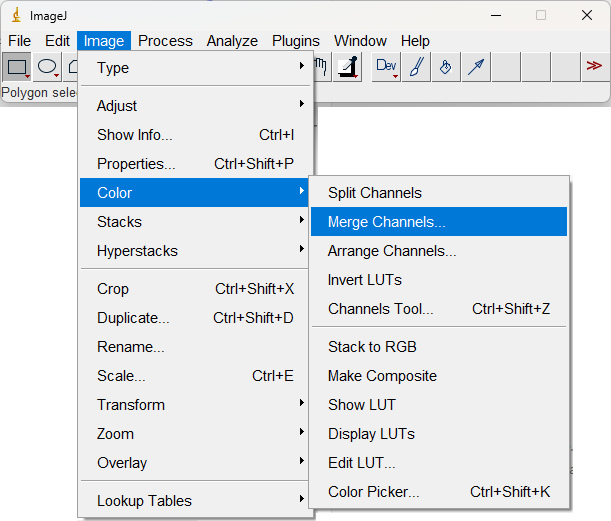
合并图像
- 使用 Image -> Color -> Merge Channels 菜单将明场和荧光图像合并。注意勾选保留原始图片,给自己留一个重新调整的机会。
- 合并后的图像是堆叠的 8 位图像,需要转化为 RGB 真彩,使用 Image -> Type -> RGB Color
- 保存图像。
使用宏命令进行批量处理
宏命令是 ImageJ 中的一个自动化功能,可以固定记录下图像处理的步骤,在大批量处理时节省了很多的时间和精力,更重要的是可以保证图像处理结果的一致性。
整体处理的步骤和手动操作是一样的,具体的命令与参数在相应步骤中讲解:
明场图像的处理
1
2
3
4
5
6
7
8
9
10
11
12
13
14
| function process_gray(grayTitle) {
selectWindow(grayTitle);
run("8-bit");
run("Set Measurements...", "mean standard redirect=None decimal=3");
run("Measure");
gray_mean = getResult("Mean", nResults - 1);
gray_std = getResult("StdDev", nResults - 1);
minGray = Math.max(gray_mean - 2 * gray_std, 0);
maxGray = Math.min(gray_mean + 6 * gray_std, 255);
setMinAndMax(minGray, maxGray);
run("Apply LUT");
}
|
荧光图像的处理
1
2
3
4
5
6
7
8
9
10
11
12
13
14
15
16
17
18
19
20
21
22
23
24
25
26
27
28
29
30
31
| function process_red(redTitle) {
selectWindow(redTitle);
run("Split Channels");
redChan = redTitle + " (red)";
greenChan = redTitle + " (green)";
blueChan = redTitle + " (blue)";
selectWindow(greenChan);
close();
selectWindow(blueChan);
close();
selectWindow(redChan);
run("8-bit");
run("Set Measurements...", "mean standard redirect=None decimal=3");
run("Measure");
red_mean = getResult("Mean", nResults - 1);
red_std = getResult("StdDev", nResults - 1);
minRed = Math.max(red_mean - 0.2 * red_std, 0);
maxRed = Math.min(red_mean + 3 * red_std, 255);
setMinAndMax(minRed, maxRed);
run("Apply LUT");
return redChan;
}
|
合并图像
1
2
3
4
5
6
7
8
9
10
11
12
| function merge_images(grayTitle, redChan) {
selectWindow(grayTitle);
selectWindow(redChan);
run("Merge Channels...", "red=["+redChan+"] gray=["+grayTitle+"] create keep");
selectWindow("Composite");
run("RGB Color");
saveAs("tif", saveDir + baseName + "_merged");
close();
}
|
文件交互与批量处理
最后我们需要在外部建立一个用于文件交互和循环批量处理的框架:
1
2
3
4
5
6
7
8
9
10
11
12
13
14
15
16
17
18
19
20
21
22
23
24
25
26
27
28
29
30
31
32
33
34
35
36
37
38
39
40
41
42
43
44
45
46
47
48
49
50
51
52
53
54
55
56
57
58
59
60
61
62
63
64
65
66
67
68
69
70
71
72
73
74
75
76
77
78
79
80
81
82
83
84
85
86
87
88
| macro "Fluorescence Merge Gray And Red" {
dir = getDirectory("Choose source directory containing *_gray.tif and *_red.tif files");
if (dir == "") exit();
saveDir = dir + "/../merged/";
if (!File.exists(saveDir)) {
File.makeDirectory(saveDir)
}
list = getFileList(dir);
n = lengthOf(list);
for (i = 0; i < n; i++) {
filename = list[i];
if (!endsWith(filename, "_gray.tif")) continue;
baseName = substring(filename, 0, lengthOf(filename) - 9);
grayPath = dir + filename;
redPath = dir + baseName + "_red.tif";
if (!File.exists(redPath)) {
print("跳过: 找不到对应的 red 文件: " + redPath);
continue;
}
open(grayPath);
open(redPath);
titles = getList("image.titles");
grayTitle = "";
redTitle = "";
for (j = 0; j < lengthOf(titles); j++) {
t = titles[j];
if (indexOf(t, "_gray.tif") >= 0) grayTitle = t;
if (indexOf(t, "_red.tif") >= 0) redTitle = t;
}
if (grayTitle == "" || redTitle == "") {
print("警告: 无法识别 gray 或 red 图像,跳过: " + baseName);
close("*");
continue;
}
process_gray(grayTitle);
redChan = process_red(redTitle);
merge_images(grayTitle, redChan);
run("Clear Results");
selectWindow(grayTitle);
saveAs("tif", saveDir + baseName + "_gray_processed");
close(grayTitle);
selectWindow(redChan);
run("Red");
run("RGB Color");
saveAs("tif", saveDir + baseName + "_red_processed");
close(redChan);
close("*");
}
print("批量处理完成!");
}
|
完整代码
重要的事情说三遍:
一定要认真阅读代码中我标了 !!! 的部分,需要自行根据实验需要修改
一定要认真阅读代码中我标了 !!! 的部分,需要自行根据实验需要修改
一定要认真阅读代码中我标了 !!! 的部分,需要自行根据实验需要修改
1
2
3
4
5
6
7
8
9
10
11
12
13
14
15
16
17
18
19
20
21
22
23
24
25
26
27
28
29
30
31
32
33
34
35
36
37
38
39
40
41
42
43
44
45
46
47
48
49
50
51
52
53
54
55
56
57
58
59
60
61
62
63
64
65
66
67
68
69
70
71
72
73
74
75
76
77
78
79
80
81
82
83
84
85
86
87
88
89
90
91
92
93
94
95
96
97
98
99
100
101
102
103
104
105
106
107
108
109
110
111
112
113
114
115
116
117
118
119
120
121
122
123
124
125
126
127
128
129
130
131
132
133
134
135
136
137
138
139
140
141
142
143
144
145
146
147
148
149
150
151
152
153
154
155
156
157
158
159
160
161
162
163
164
165
166
167
|
macro "Fluorescence Merge Gray And Red" {
dir = getDirectory("Choose source directory containing *_gray.tif and *_red.tif files");
if (dir == "") exit();
saveDir = dir + "/../merged/";
if (!File.exists(saveDir)) {
File.makeDirectory(saveDir)
}
list = getFileList(dir);
n = lengthOf(list);
for (i = 0; i < n; i++) {
filename = list[i];
if (!endsWith(filename, "_gray.tif")) continue;
baseName = substring(filename, 0, lengthOf(filename) - 9);
grayPath = dir + filename;
redPath = dir + baseName + "_red.tif";
if (!File.exists(redPath)) {
print("跳过: 找不到对应的 red 文件: " + redPath);
continue;
}
open(grayPath);
open(redPath);
titles = getList("image.titles");
grayTitle = "";
redTitle = "";
for (j = 0; j < lengthOf(titles); j++) {
t = titles[j];
if (indexOf(t, "_gray.tif") >= 0) grayTitle = t;
if (indexOf(t, "_red.tif") >= 0) redTitle = t;
}
if (grayTitle == "" || redTitle == "") {
print("警告: 无法识别 gray 或 red 图像,跳过: " + baseName);
close("*");
continue;
}
process_gray(grayTitle);
redChan = process_red(redTitle);
merge_images(grayTitle, redChan);
run("Clear Results");
selectWindow(grayTitle);
saveAs("tif", saveDir + baseName + "_gray_processed");
close(grayTitle);
selectWindow(redChan);
run("Red");
run("RGB Color");
saveAs("tif", saveDir + baseName + "_red_processed");
close(redChan);
close("*");
}
print("批量处理完成!");
}
function process_gray(grayTitle) {
selectWindow(grayTitle);
run("8-bit");
run("Set Measurements...", "mean standard redirect=None decimal=3");
run("Measure");
gray_mean = getResult("Mean", nResults - 1);
gray_std = getResult("StdDev", nResults - 1);
minGray = Math.max(gray_mean - 2 * gray_std, 0);
maxGray = Math.min(gray_mean + 6 * gray_std, 255);
setMinAndMax(minGray, maxGray);
run("Apply LUT");
}
function process_red(redTitle) {
selectWindow(redTitle);
run("Split Channels");
redChan = redTitle + " (red)";
greenChan = redTitle + " (green)";
blueChan = redTitle + " (blue)";
selectWindow(greenChan);
close();
selectWindow(blueChan);
close();
selectWindow(redChan);
run("8-bit");
run("Set Measurements...", "mean standard redirect=None decimal=3");
run("Measure");
red_mean = getResult("Mean", nResults - 1);
red_std = getResult("StdDev", nResults - 1);
minRed = Math.max(red_mean - 0.2 * red_std, 0);
maxRed = Math.min(red_mean + 3 * red_std, 255);
setMinAndMax(minRed, maxRed);
run("Apply LUT");
return redChan;
}
function merge_images(grayTitle, redChan) {
selectWindow(grayTitle);
selectWindow(redChan);
run("Merge Channels...", "red=["+redChan+"] gray=["+grayTitle+"] create keep");
selectWindow("Composite");
run("RGB Color");
saveAs("tif", saveDir + baseName + "_merged");
close();
}
|
使用方法(必看)
安装
- 在 ImageJ 中打开 Plugins -> Macros -> Startup Macros;
- 在弹出的窗口的最后,粘贴入上面复制的完整代码;
- 保存并关闭窗口,重启软件,之后应该会看到在 Plugin -> Macros -> Fluorescence Merge Gray And Red,这就是我们刚刚安装的宏命令,点击就可以立即执行。
使用
- 首先我们要创建两个同级别的文件夹,取名
raw 和 merged,前者用于存放原始的细胞图片,后者用于存放处理后的细胞图片;
- 将原始图片放入
raw 文件夹中,注意对应的灰度和荧光图片的文件名前面必须一致,后面必须分别以 _gray.tif 和 _red.tif 结尾,例如 cell_1_gray.tif 和 cell_1_red.tif,当然如果你的荧光是绿色的那你就命名为_green.tif,以此类推;
- 一定要认真阅读代码块里面我标了
!!! 的部分,根据自己实验的参数进行修改;
- 运行脚本,脚本会弹出一个对话框,选择
raw 文件夹;
- 脚本会自动运行,运行结束后会在
merged 文件夹中生成处理后的图片,文件名分别为 cell_1_gray_processed.tif、cell_1_red_processed.tif 和 cell_1_merged.tif。
后记
本文给出的是一种处理普通图片格式比如 tif、jpg、png 等的方法,如果你的实验够高大上,是用比方说蔡司的系统采的图,那就完全可以用相应的 Zen 软件进行处理。